Cooking & Baking
Related: About this forumGalantine de poulet aux champignons, jambon, fromage, épinards et saucisses (VERY pic heavy)
Last edited Fri Nov 15, 2013, 08:44 PM - Edit history (6)
(Please pardon the Google translated French if it is not grammatically correct!)
After putting up the threads of the menus from my ocean voyage and seeing "Galantine of Capon" a time or two, I decided to investigate what it was and how to prepare it.
So, I made a "Galantine de poulet aux champignons, jambon et épinards et saucisses" or Galantine of Chicken with mushroom, ham, cheese, spinach and sausage.
A Galantine is a deboned fowl, either a quail, a capon, a chicken or even a turkey or duck, in which the skin and meat are separated from the ribcage in one piece. This is then stuffed, rolled and trussed. The other day I put up this thread which has a video of Chef Jacques Pepin demonstrating the process.
My investigation revealed that a traditional Galantine is poached and then served cold.
Well, I didn't do it that way! I roasted mine in the oven. It came out OK...I mean it was delicious and all, but poaching would have been better.
Anyway....If you haven't watched the video in the above linked thread, have a gander at it (gander...get it? Yes, I know a gander is a duck, not a chicken, but "have a rooster at it" makes no sense! Sorry) and then have a look at the following pics.
My first attempt at doing this came out OK, but Chef Pepin makes it look REALLY easy. It wasn't difficult, but mine didn't come out as pretty as his, as you will soon see!
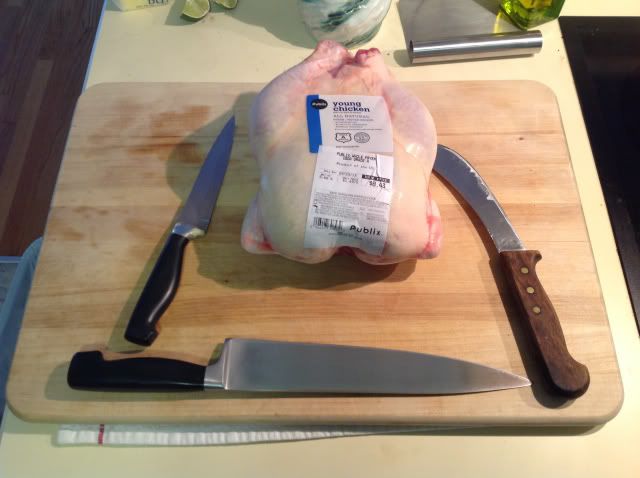
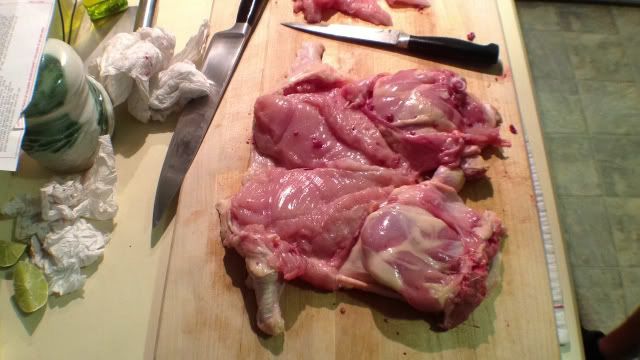
I started with one each, regulation roasting chicken;
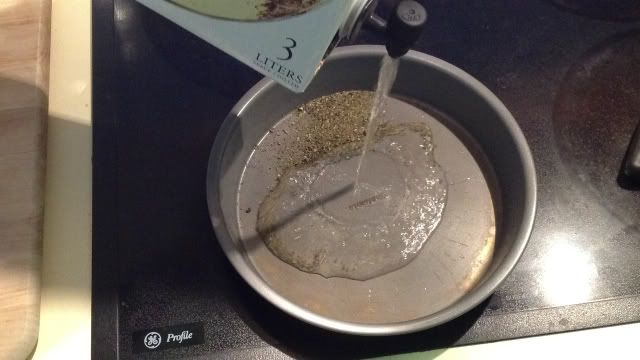
I want to marinate the end result, and I am fond of white wine with basil, so I started with that so the basil has time to steep and flavor the wine.
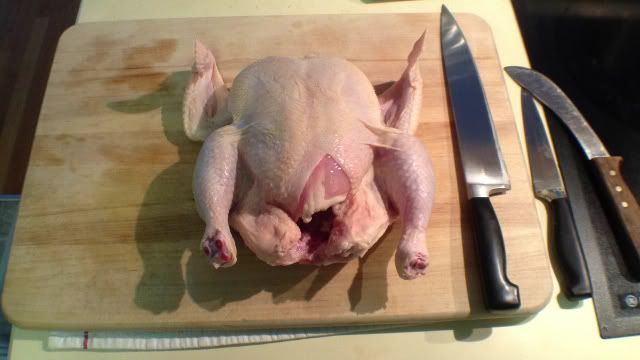
The chicken out of its bag, giblet bag removed and the bird patted dry with paper towels. I have the 3 knives I think I might need at the ready, but I didn't use the skinning knife at all. I also don't have a small paring knife, so the short knife is what I used for much of the process.
Following Chef Pepins method, the first thing to do is to cut off the flapper end of the wings.
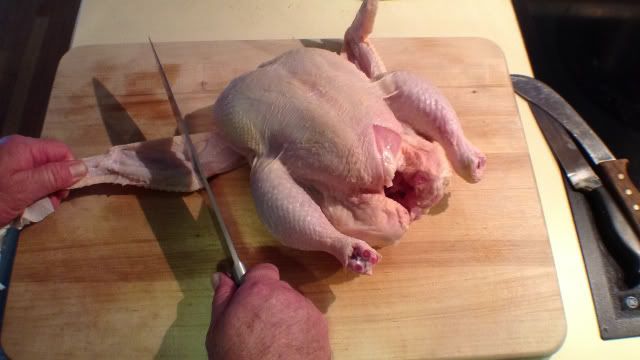
Cut the wings off at the second joint. It's easy to find and your knife will go right through it, so long as you have it positioned right at the joint (obviously).
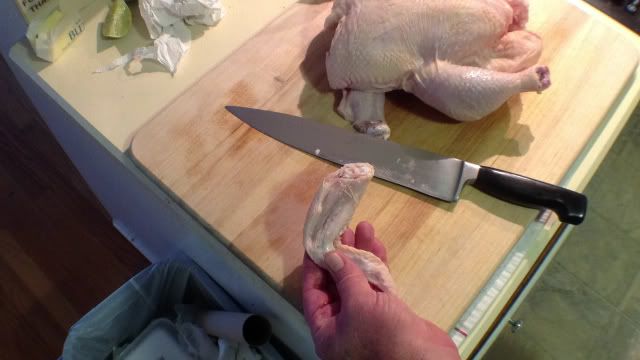
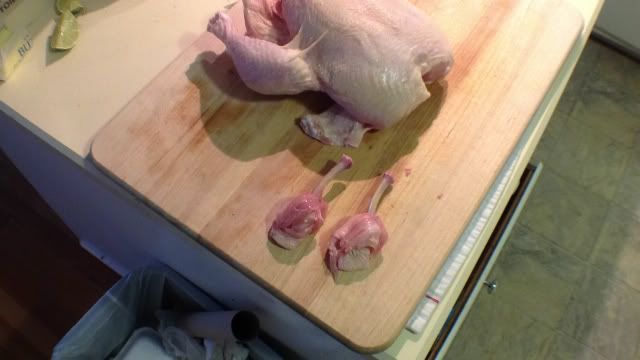
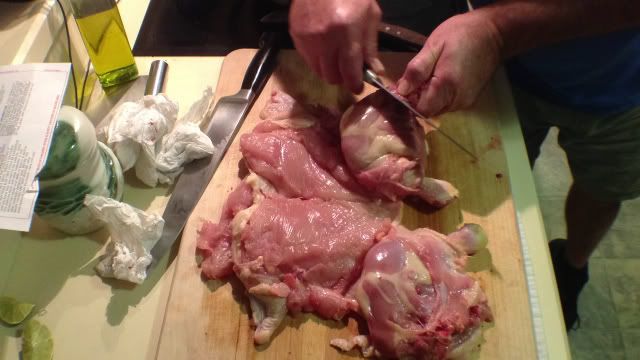
Pepin shows how to make a "Lollipop" out of the center section of the wing. It was just about as easy as he made it look. Just break the joint, place your thumb as he did....
pull, and remove the smaller of the two bones.
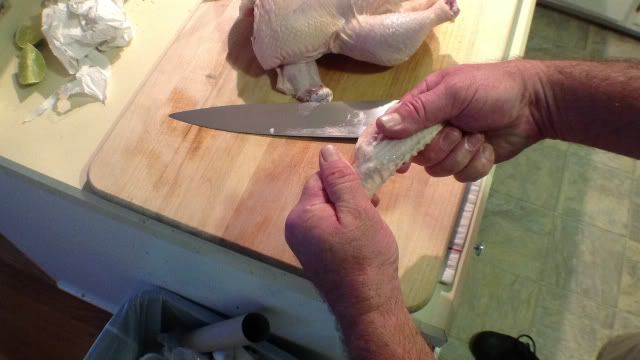
You can see the smaller bone on the board next to the wing tip. Now fold the meat down around the base of the remaining bone.....
Voila! Repeat the procedure on the other wing, and you have two nifty little chicken wing lollipops.
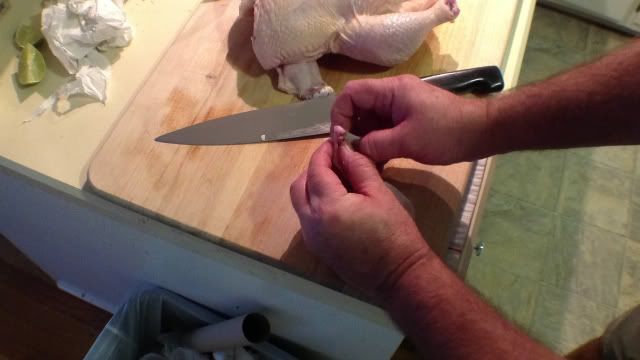
Now to remove the wishbone. I first located it with my fingers, then with the tip of my knife, I cut in alongside it, I kept pressure on the bone and just cut down to the bottom of it. Same on the other side, then pulled.
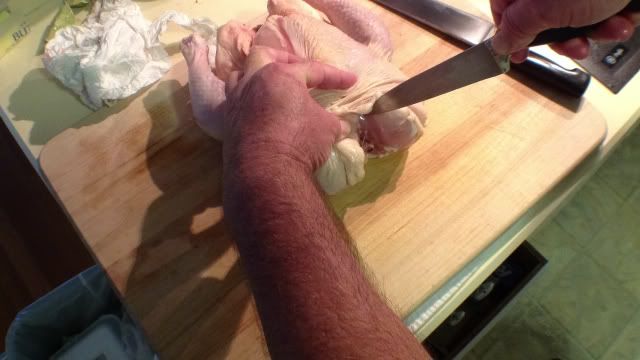
It came right out.
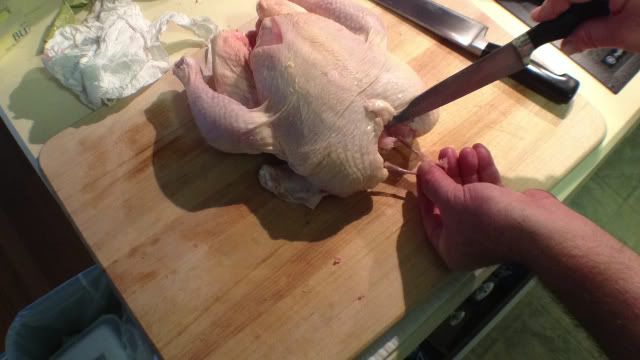
Now I cut the skin along the top of the backbone, front to back.
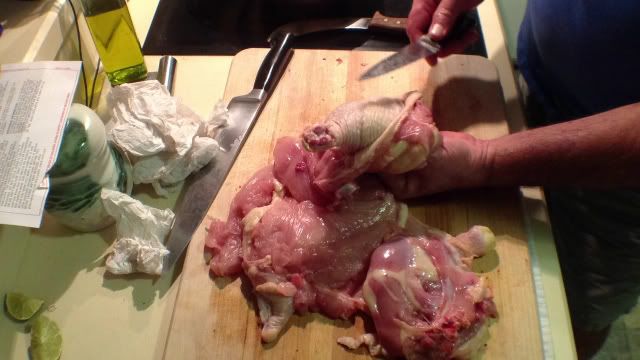
Locating the wing joint. When I found it with my fingers, I cut through it. Same on the other side.
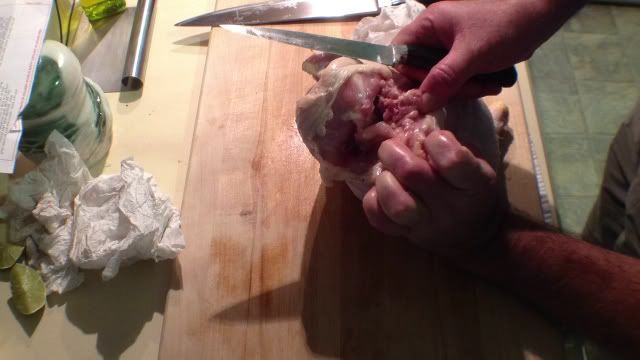
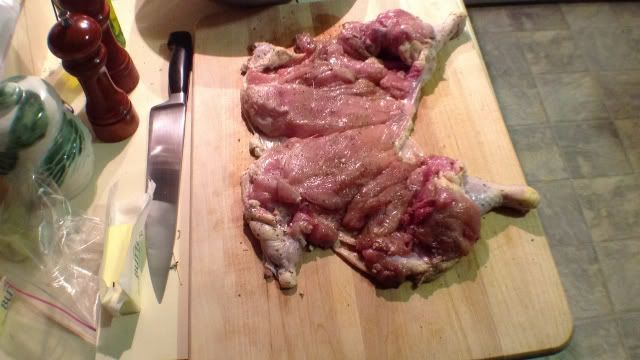
Then just peel the skin and meat back until the "oysters" (my finger is pointing at it) are exposed, one side at a time.
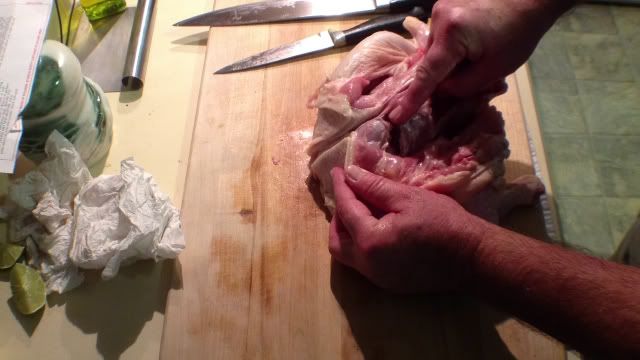
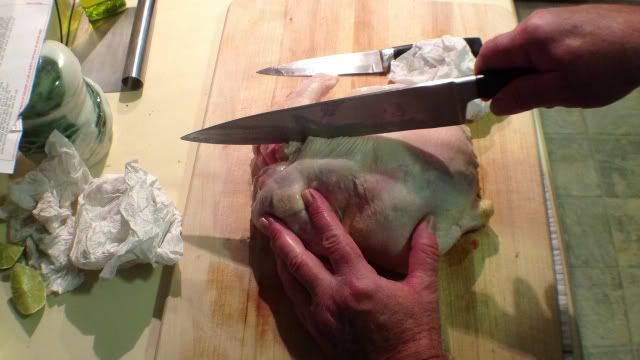
I then stood the bird on end with the breast side facing me and with 2 fingers placed between the breast meat and the fillets, pushed down and then pulled.
It will look like this;
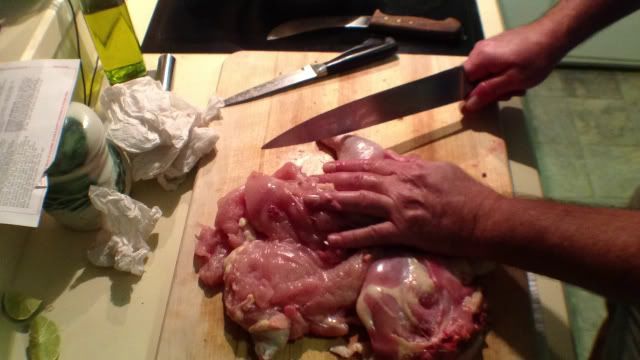
Then, as Pepin shows, turn the bird around, cut through the oyster, break the leg bone connection, cut it free and pull the entire skin and meat assembly (! Well...what would YOU call it? lol) off. I removed the two long fillets that remained attached the same way the Chef did - with my fingers. Mine didn't separate nearly as cleanly as his did, but there you go!
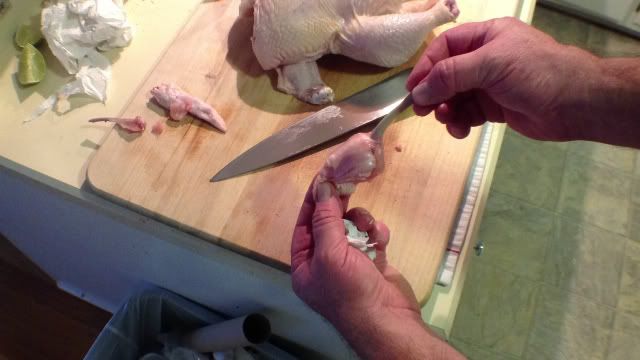
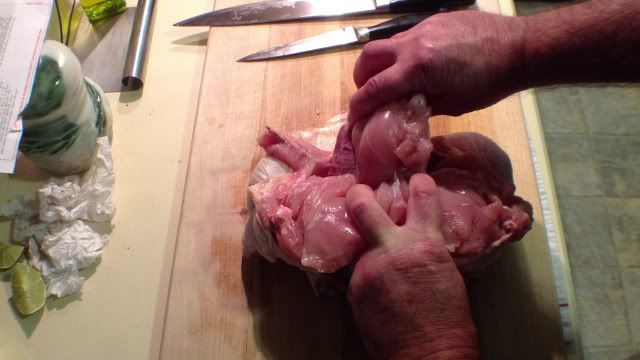
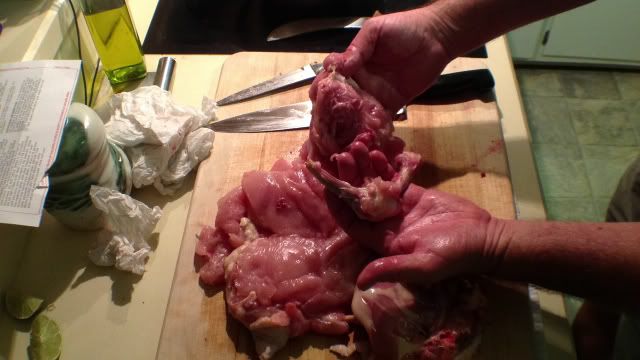
Now to remove the leg bones. Find the end and cut around it....
then scrape down until the middle joint is reached.
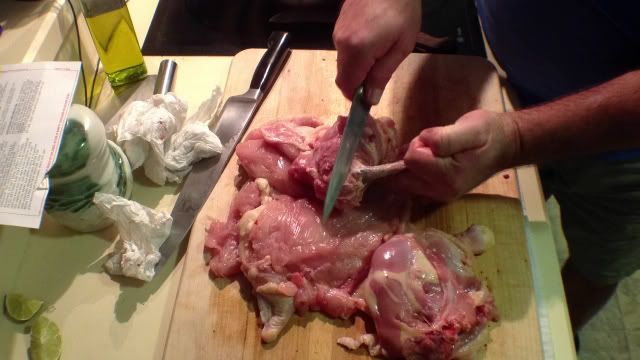
Cut around that joint and scrape again until you reach the end of the drumstick.
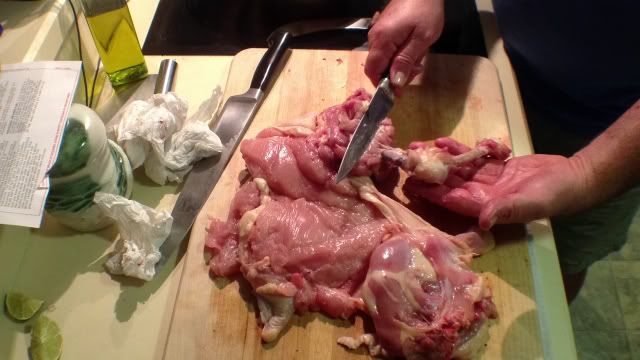
Push the whole thing back through....
and give it a whack with the back of your knife to break the bone....
and pull it out. Easy. Similar procedure for the remaining wing bones, except that there is no need to whack the end, as it has already been cut off.
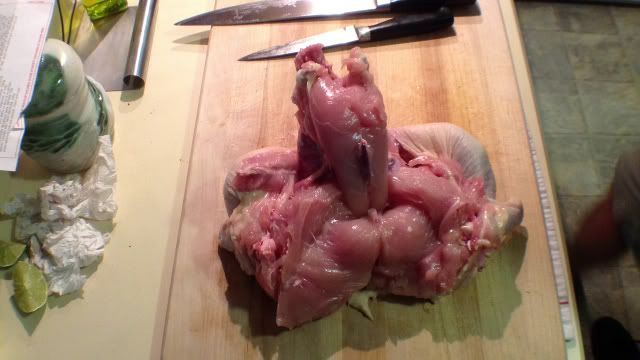
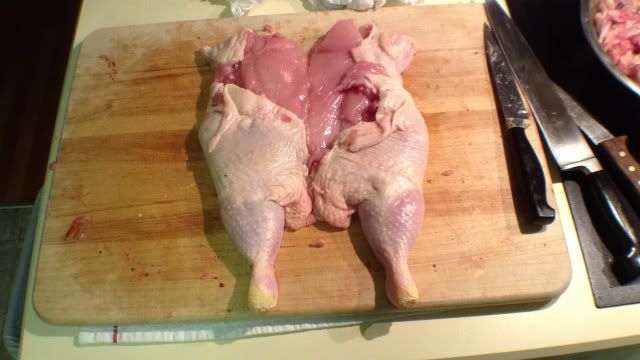
The finished product;
Salt and pepper.....
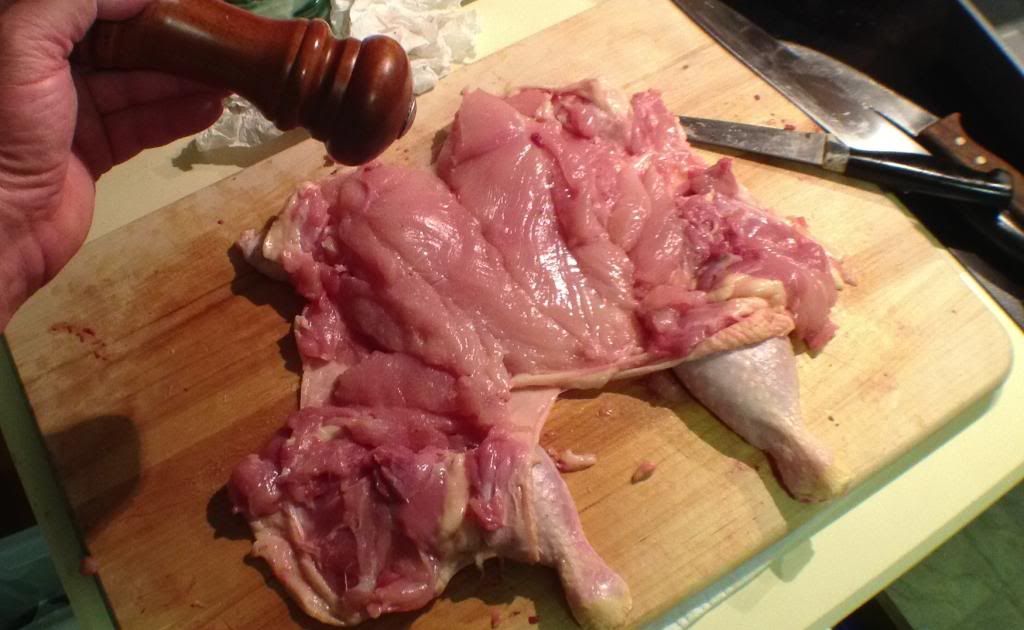
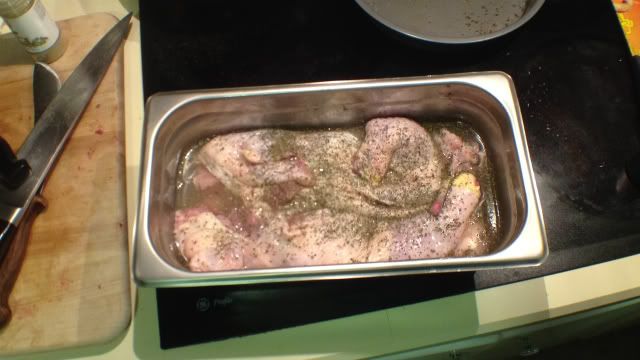
and into a suitable container to marinate.
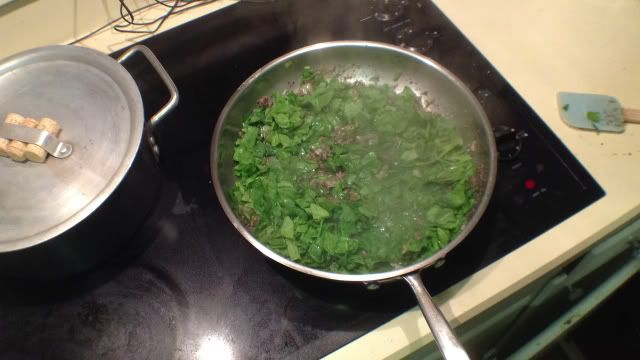
Now for the stuffing. I started by sweating down some finely chopped onion and Portabella mushrooms, then added spinach.
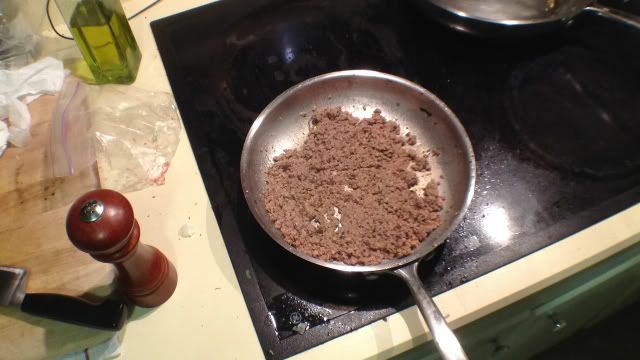
I used a single link of a mild Italian sausage which I removed the casing and cooked till done. The variety of stuffing you could make is as varied as your imagination, just be mindful of the consistency when you're done, meaning I don't think having it too wet or full of fat would have been good. I added 2 slices of finely chopped, cooked bacon, 3 slices finely chopped ham I had in the fridge, some Mozzarella, a little Feta, and some Swiss cheese. There was also a small amount of poultry stuffing mix that I wet with wine, and added garlic, basil, sage and parsley as well.
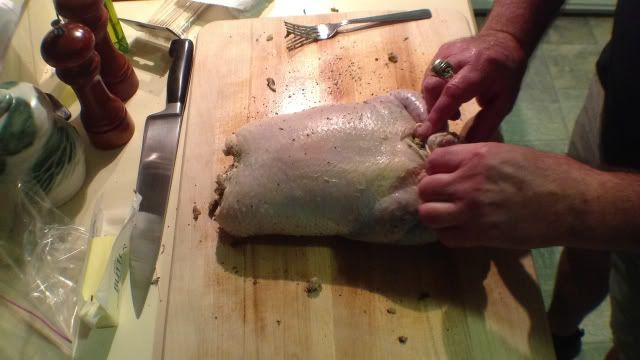
By now the chicken had been marinating for about an hour or so. I laid it out on the board....
and proceeded to stuff it.

Shove some in each leg cavity.....
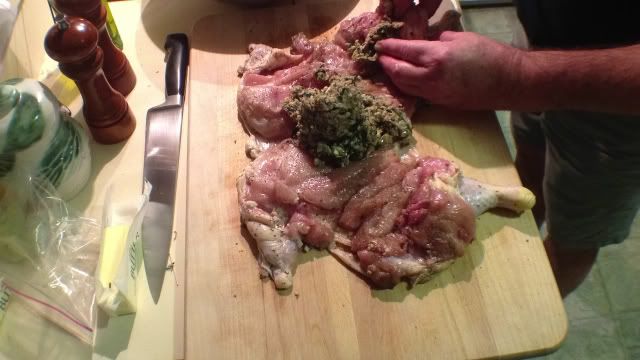
and spread the rest across the meat.
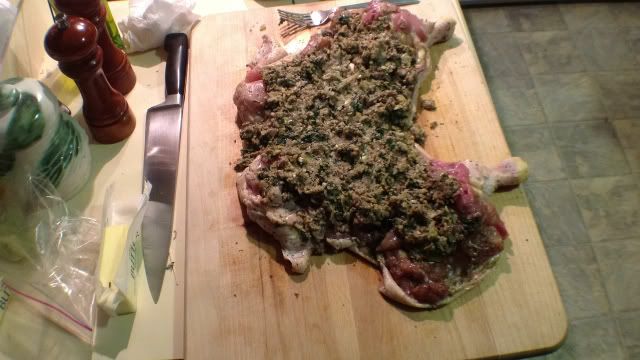
Fold one side in....

and then the other.
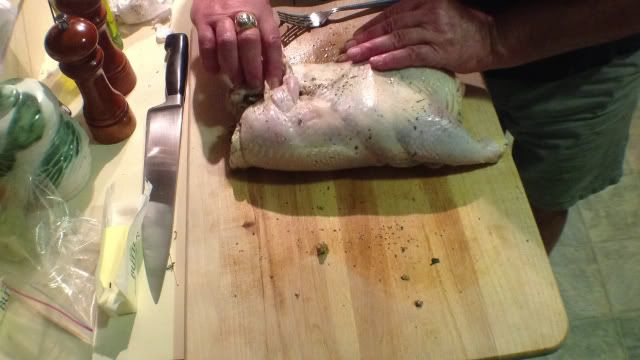
Carefully roll it over and start trussing. I have started by tying the ends of the legs together.... (Edit here) I should have mentioned in the original text the following; Once I folded over the second side, I noticed it just wanted to ease apart and fall flat open. So I realized I needed to secure it closed while I tied it up or the whole damned thing might fall apart! I happened to have some short, 4" bamboo skewers handy (Toothpicks and regular shish-ka-bob type skewers would work too) and I used them to temporarily hold the seam together while I rolled it over and trussed it. As soon as I had it tied up, I removed the skewers. I regret the omission.
then by making loops,......
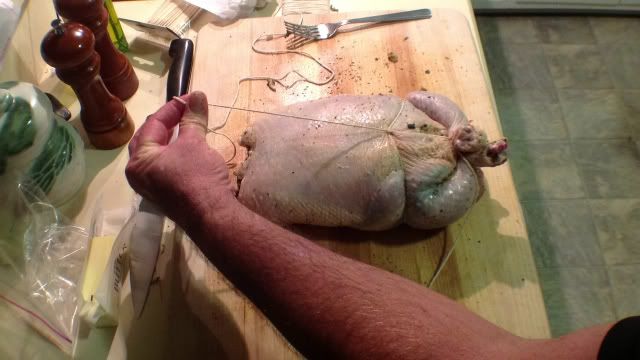
went up the length of the bird.....
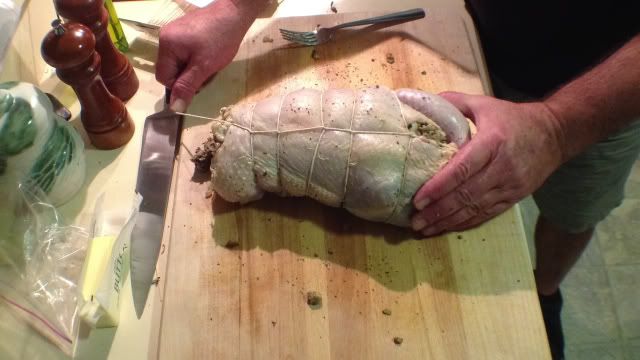
flipped it over and ran the string around each loop I made, then tied the end to the tail of the knot at the legs. (Edit again; You can see a couple of the short bamboo skewers I used as temporary securement, laying on the board at top).

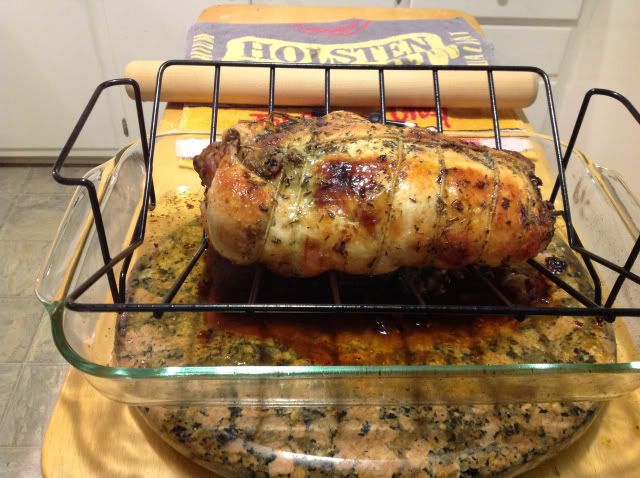
And there you go. I placed it back in this pan because...well...by the time I got to this point it was 10:00 in the evening. I had to refrigerate it till the next day or I would have been at it until 2:00 AM! If I had started it earlier I would have cooked it right away, and that is probably the right idea. I was concerned that I might have problems since I wrapped raw chicken around cooked meat and vegetables. But no worries. All is fine. I didn't have any ill effects!
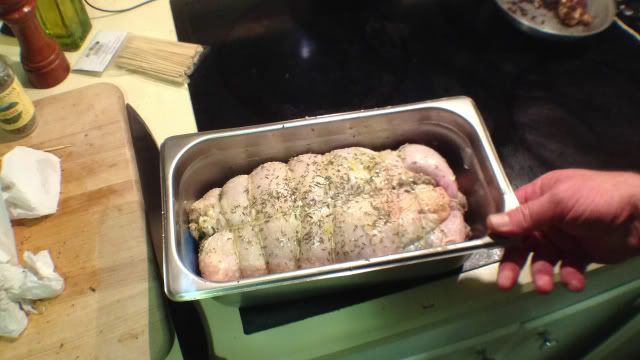
As I mentioned earlier, I roasted it. I used my rack and a roasting pan but this was a mistake. Perhaps it was my oven, I don't know, but the top came out looking gorgeous and perfectly cooked, but the meat on the bottom was not done. Maybe I should have rotated it, Or better yet, done it on a cookie sheet. I figured the bottom would have been cooked properly if it was in direct contact with the roasting pan or sheet. I let it go for about 90 minutes, starting at 400 for 25 minutes then turned down to 350 for the remaining time, checking the internal temp as it went. I got it up to 160 before I pulled it but it wasn't enough. This is why poaching would be better, as the water will ensure even cooking all the way around. But hey! First time and all....but it was still frickin delicious!
Sliced open. Not bad....not bad at all. But again, had I poached it and then chilled it before slicing, the stuffing would have held in place much nicer.
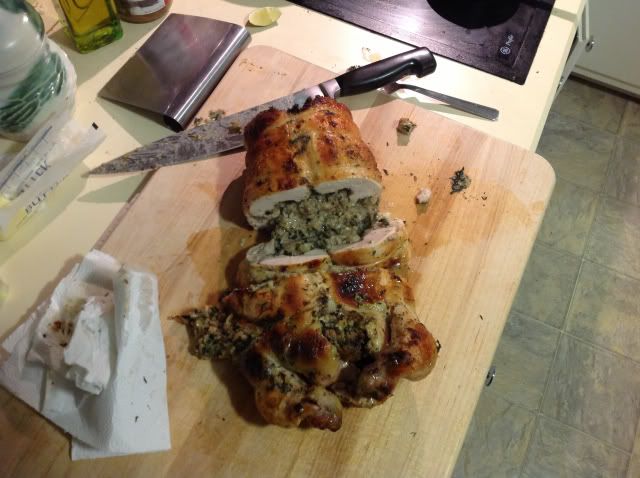
As it turned out, I had two slices for dinner the other night and then had a bit of a dilemma. As you can see, I cut it open in the middle, because I wanted to a) have nice big slices to eat and b) make for a better photograph. The dilemma was that now I have two sides that the stuffing is running out of on an item that needs further cooking. Solution? I wrapped it in cheesecloth and re-trussed it to hold the two halves together. Then I placed it on a cookie sheet and put it back in the oven at 350 for about 25 minutes. That took care of the undercooked bottom perfectly.
This was an interesting exercise and kind of fun, as well. It strikes me as a dish that has great potential for improvisation, not to mention it looks elegant as hell!
I hope you enjoyed this.
Eat and be well!
 = new reply since forum marked as read
Highlight:
NoneDon't highlight anything
5 newestHighlight 5 most recent replies
= new reply since forum marked as read
Highlight:
NoneDon't highlight anything
5 newestHighlight 5 most recent replies

sinkingfeeling
(51,444 posts)
A HERETIC I AM
(24,365 posts)Be happy to! Not sure how well it will keep, however!

pscot
(21,024 posts)A HERETIC I AM
(24,365 posts)I'm a damned car hauler. If I can do it, so can you!

pinto
(106,886 posts)(aside) One Thanksgiving, years ago, my sister & BIL made the turkey like this, but stuffed it with a small whole ham and veggies, then trussed. Browned the turkey on the BBQ then finished it all off with a long, slow cook in the smoker (BIL is an avid outdoor cook).
Was outstanding. They both said it was fun, but a one time thing. A whim they wanted to pull off well and did. But both found it more work than they wanted to repeat.

A HERETIC I AM
(24,365 posts)
greatauntoftriplets
(175,729 posts)Last evening I asked the triplets' father if he could debone a whole chicken (he's a professional chef) and of course he can. I'm not surprised that it took you a long time.
A HERETIC I AM
(24,365 posts)LOL...well, yes, I am at that, to be sure.
You have mentioned the pro in the family in the past, I sure would like to pick his brain over a beer or two.

elleng
(130,834 posts)I'll bring the wine!!!


A HERETIC I AM
(24,365 posts)A nice Riesling, perhaps?
elleng
(130,834 posts)A HERETIC I AM
(24,365 posts)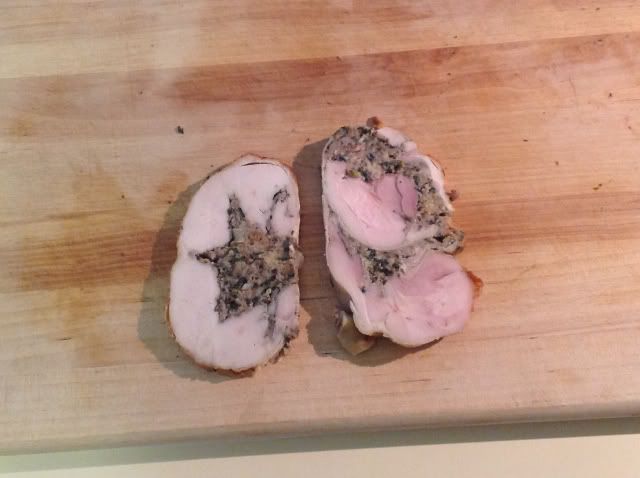
The stuffing has set up nice and the slices hold their shape. Quite tasty cold as well!
The slice on the right is from the leg end, the other is from the breast end.
rdharma
(6,057 posts)Thank-you, A HERETIC I AM. You have motivated me to attempt this project. I've even ordered some "butcher twine" (which I never used before).
I've got a big basting pan and rack in the basement. They're "turkey size"..... but they'll work.
A HERETIC I AM
(24,365 posts)because, as I mentioned, it didn't cook thoroughly on the bottom. Now that may have been attributable to a couple factors, such as my oven is crap (!) or I used a glass roasting pan instead of metal or whatever...
But just be prepared. That's all.
I recommend you search recipes before you go by what I showed.
rdharma
(6,057 posts)I'm adventurous..... but I hate failure ....... and I hate uncooked poultry even more.
This is what my broiler and rack look like (but with fold down handles rather than the ones shown in photo)

As you can see, the bird is held in the rack and doesn't actually contact the bottom of the broiler. I believe this will provide better (more even) temperature distribution than a casserole or baking dish.
I have multiple temperature gages, so I'll be keeping a close eye on proper temps. I don't mess around when it comes to proper cooking temps and safety.
There was a young roaster on sale today at the local store on sale (marked down from $8.90 to under $6.00). I was so tempted. But I've got other cooking projects to tend to before I try this one. Besides, my butcher twine has not arrived yet.
Thanks for the info. I'll keep you posted.
A HERETIC I AM
(24,365 posts)If you can recheck the link and modify it, we'll be able to see it. As it is, it goes to a non existent file.
rdharma
(6,057 posts)But mine isn't stainless.....
A HERETIC I AM
(24,365 posts)Very similar to the one I own, but mine has a dark coated inside and the rack is dark coated as well.
OK...so it isn't that similar!
Well, Here's hoping you have great success!

rdharma
(6,057 posts)Dziękuję!
msanthrope
(37,549 posts)