Democratic Underground Latest Greatest Lobby Journals Search Options Help Login
Google

Got started on the paint job for wife's bike

Printer-friendly format Printer-friendly format
Printer-friendly format Email this thread to a friend
Printer-friendly format Bookmark this thread
Home » Discuss » DU Groups » Recreation & Sports » Motorcycle & Scooter Group Donate to DU
 
ThomWV Donating Member (1000+ posts) Send PM | Profile | Ignore Fri Aug-22-08 08:57 AM
Original message
Got started on the paint job for wife's bike
Edited on Fri Aug-22-08 09:06 AM by ThomWV
I finally got started on the paint job for my wife's Sporty. We have managed to pick up a gas tank, front fender, and oil tank cover for it on E-Bay. Still looking for a battery cover and rear fender. I'm watching several of each and should have them soon.

The tank we got had two small dents in it. Tuesday I removed them (yes, heat and extreme cold does pull dents out) and then prepped the three parts I have for paint. You know the drill, fill, paint, sand -> fill, paint, sand -> fill, paint, sand. Once I got everything straight and smooth I shot 4 coats of epoxy primer on it, that was wednesday. My goodness that stuff (PPG 170) sets up hard. Yesterday was finally paint day. I shot on 5 coats of base/sealer. That may sound like a lot but its not. Although I used a common 3-part (paint, catalyst, reducer) primer (PPG Omni 170**) I switched to one of the 'new' water based products for the rest of the job. Its being shot in the stuff made by Auto-Air Colors*. The paint is essentially non-toxic as compared to standard automotive paints and to me that is important. However I have to tell you, I'd be using the stuff anyway just because of how easy cleanup is with it. The downside is that you have to shoot very light coats, and more coats, and more coats, and so on. It takes 3 coats just to completely cover a surface. The tech sheets for the paint say it takes up to 6 coats to cover with their Candy Color series. I'll know more about that next week.

I wish I knew where she wants this paint job to go, but so far all I know is its going to be blue. I know she is looking at graphics that are way beyond my skill level but with today's products its pretty amazing how you can get away with some product intermixing. I am off to the local Crafts store today to pick up several different paints to use for test splotches to see if they are compatible with the stuff I will be using. If their stuff will stick to my base and if the inter-coat-clear from Auto-Air or a standard urethane clear can be used to seal it then the sky's the limit as far as graphics go. Even if I can't do it we certainly know people who can draw and paint. All they have to do is keep it thin.

Anyway I'll let you all know how it goes. So far so good. I should say this too. I bought myself a new paint gun for this event. The one I had/have (Sharpe/Finex****) is a fine old conventional gravity-feed clunker but with today's paints its really only suitable for the final clear coats. So I had a good excuse (after all, it is the wife's bike) to get a good little gun. I bought an Iwata detail gun*** that is LVLP (Low volume low pressure). Without going into it much the point is that this little spray gun uses relatively low air pressure to atomize and deliver the paint and that means less overspray with means less pollution as well as less expense. As it turns out the model I picked up (LPH-80 1.2mm) is just wonderful for motorcycle sized parts. It is just a joy to use. If you are thinking about buying a small spray gun I would certainly recommend one of these things - they are sweeeeeeet. Managed to talk my way into a new airbrush for this one too. When opportunity knocks a guy's gotta be quick.

* http://www.autoaircolors.com/

** https://buyat.ppg.com/refinishProductCatalog/ViewProductListing.aspx?BrandID=f7b90464-5ca2-4bef-95c9-eb8aefd601f1

*** http://www.anest-iwataeu.com/products.asp?Lin=20

**** http://www.sharpe1.com/sharpe/sharpe.nsf/Page/Finex+FX2000
Refresh | 0 Recommendations Printer Friendly | Permalink | Reply | Top
JustABozoOnThisBus Donating Member (1000+ posts) Send PM | Profile | Ignore Sat Aug-23-08 11:18 AM
Response to Original message
1. How does heat and cold remove dents?
I have some little dents (in a car) that I'd like to have vanish. No dents in the motorcycle, so far.

Also, can you post pictures of the progress? Even a tank or fender with primer and bondo is interesting. Not that I pretend any artistic talent, but like seeing the process.

I like your plan of getting extra parts to paint. The original parts (blue, if I remember right) looked great!

:thumbsup:
Printer Friendly | Permalink | Reply | Top
 
ThomWV Donating Member (1000+ posts) Send PM | Profile | Ignore Sat Aug-23-08 01:16 PM
Response to Reply #1
2. Heat/cold/dents
Edited on Sat Aug-23-08 01:25 PM by ThomWV
I'll post some pictures soon.

The heat/cold trick works like this, and it only works on non-crease dents as far as I know. First you heat the metal at the dent site and immediately around it. You can do this with a heat gun I am told. It has to get hot to the touch but not necessarily hot enough to do any harm to the paint. As soon as you get it hot you then do one of two things - I am told. The first is you may want to tape a chunk of dry ice directly in the middle of the dent and the other method (which I used) has you rapidly cooling the area by inverting a can of "air" that is used to clean computers and such and spraying out the propellant, which I believe is CO2. I didn't care about the existing paint so I just took a propane torch to the tank and got it pretty hot then sprayed it. Whatever it is what you get is the propellant expelled as a liquid, and a very cold one at that. Like I said, it took out about half of the dent we had. Our dent was maybe 1/8" deep and about 2" round, just like you'd get from a large hail stone. After the pop-out it was shallow enough (more wavy than anything) that I filled it with glazing putty rather than body filler. Glazing putty is used to fill in sanding scratches and very small nicks; its really more of a very thick paint (about like tooth paste coming out of the tube) than a plastic filler. It comes in a large tube just like toothpaste too.

Anyway the tank had a couple of other scrapes on it too so I fixed them and then got it in shape. Last night I shot a couple of more coats of sealer on it and wet sanded (600 grit) them this morning. The tank is ready to paint right now, I sanded through the sealer on the fender and side cover so I'll have to reshoot them this weekend sometime.
Printer Friendly | Permalink | Reply | Top
 
ThomWV Donating Member (1000+ posts) Send PM | Profile | Ignore Mon Sep-01-08 01:41 PM
Response to Reply #2
3. Paint and sand, paint and sand, paint and sand (Warning - very photo heavy)
Edited on Mon Sep-01-08 01:50 PM by ThomWV
I have a much better idea where this is going now. That certainly helps. I finally convinced my wife I did not have the skills or talent to do the intricate airbrush work she wants. I think she may try to do the artwork herself or find someone else to do it. From my point of view then things got a got a lot simpler. I'll shoot something within my limited ability and life will be good until the winter. Over the winter the custom paint I shoot now will come back off and we'll head back to a basecoat for her to cover with anything she wants as long as its compatible with some kind of clear coat. Remember, I have a sealer that will allow her or someone else to paint it with water colors if they want to. Then it can come back to me to seal it and make it shiney. This I can do.

Back to where we are. Not much further actually. I shot dark basecoat and sanded and then shot more basecoat and sanded and so on until I had a completely unbroken coat of the stuff, then I shot 3 more coats. The original base I had put on there was light colored, much different stuff. The dark stuff was thick as mud and I really had to open up the gun (1.2mm tip) to get it to squirt out even after I reduced it to the maximum (25%v) the tech sheets recommend.

I've been using a hair dryer to flash it right after each coat. Maybe I should explain 'coat' in the context of this stuff too. The tech sheets are adamant about light coats for this paint. I found out why yesterday but I'll get back to that. So when I say I shot on a coat of paint what I generally really mean is that I shot on 3 coats of paint to get full coverage. You mist this stuff on like it was an indicator coat, let it dry, and then go back and do it again. Because its water-based there is no real 'flash' time on it and the stuff can sit in the gun for a week as long as you blow a bunch of air through it to get all the paint out of the passages when you stop shooting. Needless to say I don't actually do that. I am meticulous about cleaning the gun immediately after each use.

So I got the base coat on and sanded with 1,000 grit yesterday. Everything looked fine.

In the meantime I have been playing with a couple of test panels, painting some real-fire on them and trying to become more proficient with the airbrush. I had taped off a section of panel (sides panels off an old riding lawn mower) to the shape of the top of the tank we have so as to try to start getting a sense of proportion for what is comming. So I painted on it for a couple of days. I put on a bunch of flames, then put on a bunch of lightening strikes, and then put on a bunch of candy blue over a silver flake base, and then just kept crapping around with this and that. I was careful to make sure I stuck with the tech sheet recommendations for prep and drying and reduction and all of that. This was as much a test of the paint as it was of any little ability I might have. When I pulled up the tape it took a lot of paint with it. Lesson learned. By looking at which coats peeled up and which didn't I realized I had been putting it on too thick and even though I thought I had it dry it really wasn't dry enough. Like I said, lesson learned.

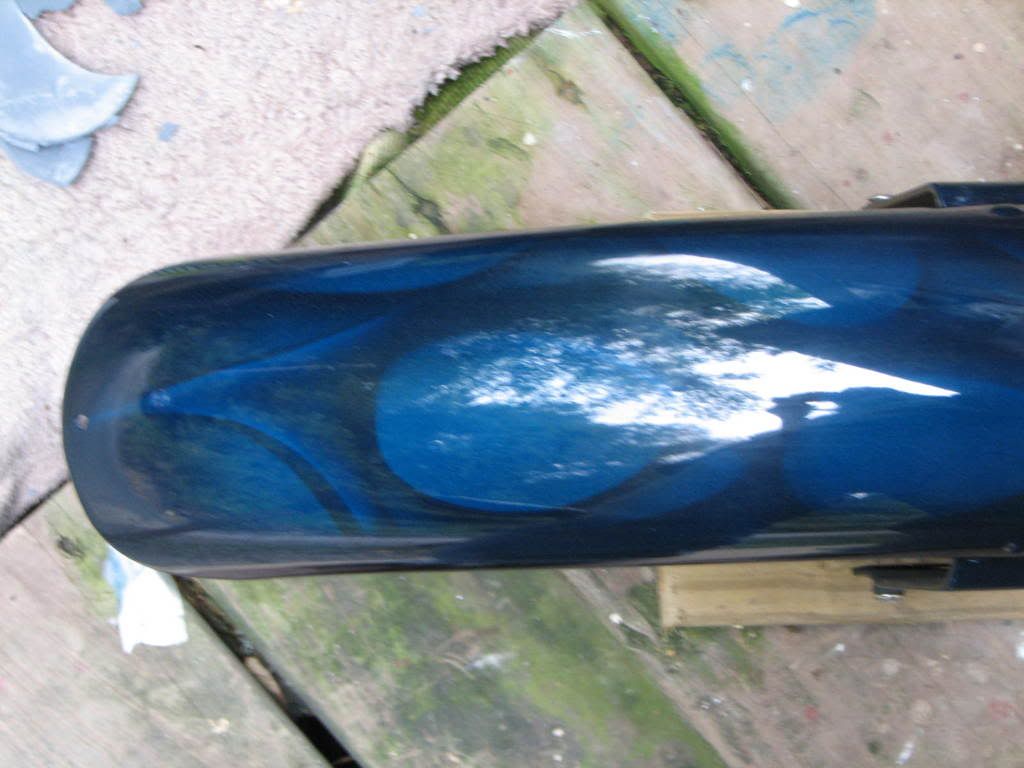
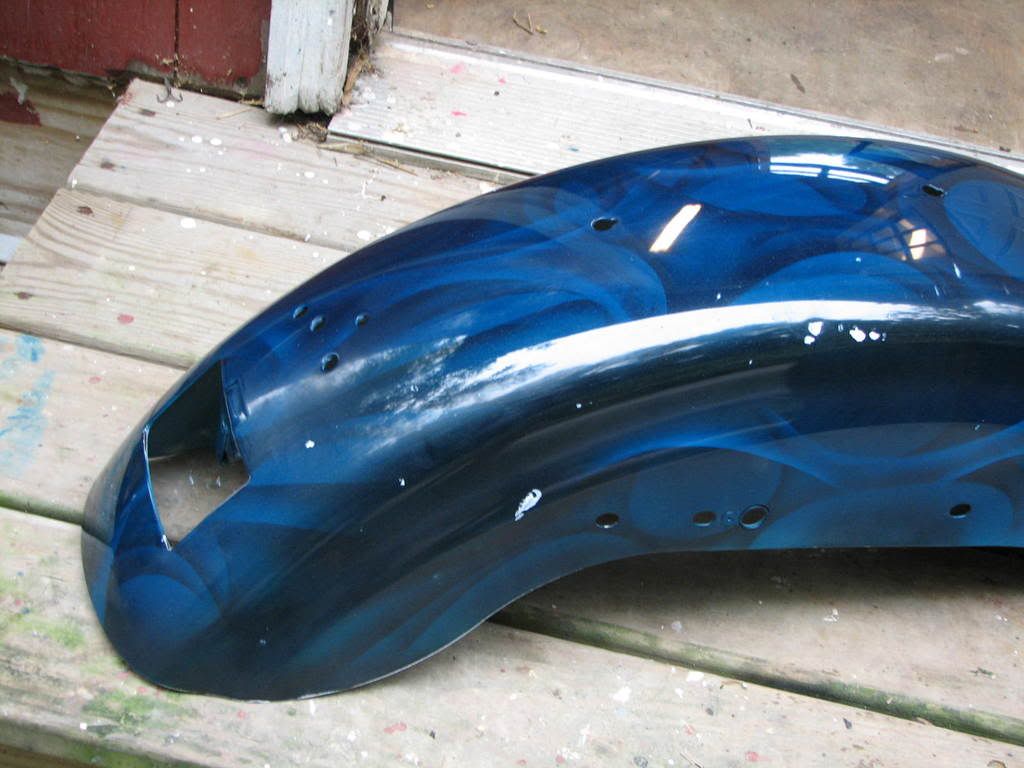
So this morning I shot on the first of the color. Now this isn't saying much because the first color is simply black. In the last 8 hours I've poured on 6 coats of transparent black. I hit it with an ultrafine skuff pad after coat 3 and let it set in the sun for a couple of hours. Its back out in the sun right now as you will see in the two bottom pictures.

So here is the tale in pictures.


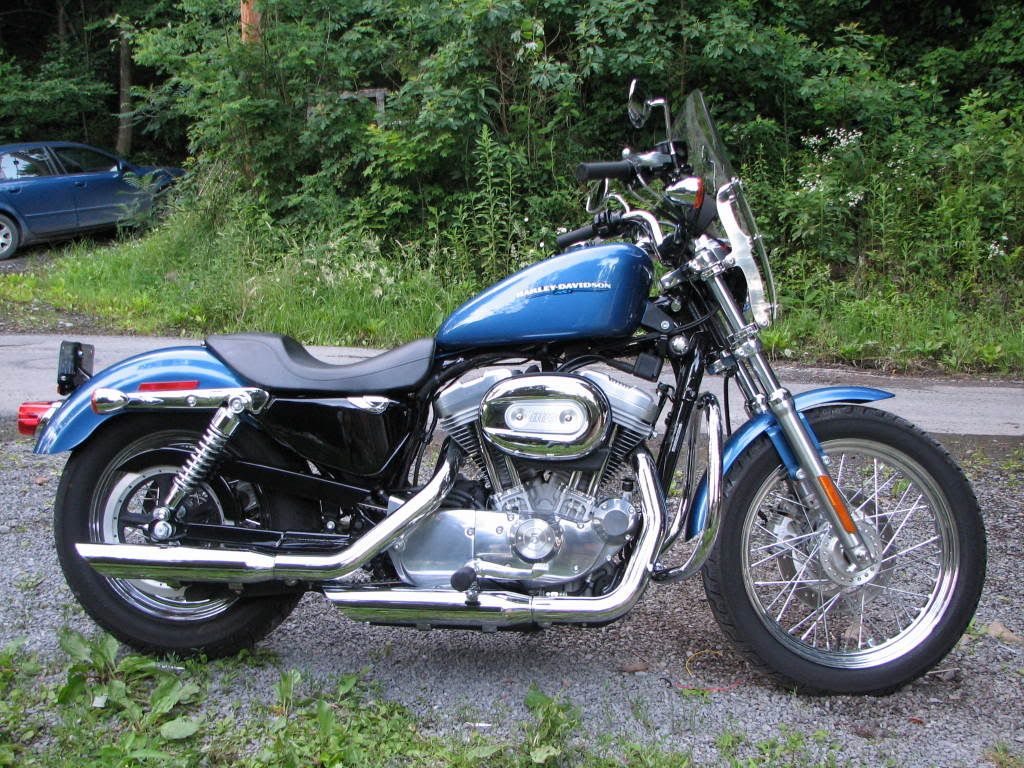
First how the bike looks now:


As you can see the new tank is a much different shape:


Here's the main dent:


Here it is in light base on top of epoxy primer, and now the real work begins:


In light base after fixing the various imperfections. (P.S. note the flush gas cap we picked up for it)


As it sits today in the sun drying with transparent black over dark base. This is the underpinning for everything that will follow:


Printer Friendly | Permalink | Reply | Top
 
JustABozoOnThisBus Donating Member (1000+ posts) Send PM | Profile | Ignore Thu Sep-04-08 07:19 PM
Response to Reply #3
4. Looks good so far. Are all the parts black?
The tank looks like it's blue, or is it just reflecting the sky? Anyway, the project looks like it's coming along great.
Printer Friendly | Permalink | Reply | Top
 
ThomWV Donating Member (1000+ posts) Send PM | Profile | Ignore Sat Sep-06-08 05:52 PM
Response to Original message
5. Test Panel
Edited on Sat Sep-06-08 05:57 PM by ThomWV
Its probably the reflection, the thing is actually sort of a matt black. The shine comes later with the clear coat.

I'm thinking because she wants it basically blue I might do something like this:


Actually I did this earlier this afternoon to check to make sure that the different types of stuff I was using are compatable. The black and the colors are actually the water based paint but when this was taken I had just shot the second coat of an intercoat clear over it that was the standard 2-part nasty stuff. The taped off part is the same width as the front fender. I think I'll do something like this but maybe put some purple in it and tighten up the pattern so the loops are smaller but more of them. I dunno. What you think?

On Edit: That panel is actually one of the two side panels for my riding lawn mower. If nothing else I will come out of this with a cool looking mower.
Printer Friendly | Permalink | Reply | Top
 
ThomWV Donating Member (1000+ posts) Send PM | Profile | Ignore Thu Sep-11-08 05:33 PM
Response to Original message
6. Between coats ...
The rear fender showed up today, its the right one. I got it sanded and put a coat of epoxy primer on it. Then I sanded it again and found everything that was wrong with it. There wasn't much. It had one nice gouge in the paint all the way to metal and two very slight dents beside the cutout for the taillight. So I got them fixed and just finished shooting the second blast of primer on it. The epoxy is rock-hard once is sets up so it acts to protect the underlieing metal. So I was very particular about getting the inside of the fender well sanded, then well cleaned, and now well painted. The epoxy should offer some protection from stones and such.

Anyway all the parts are here now and so I should be able to at least finish the color tomorrow, might even get the clear coat on it. Unfortunately, or maybe fortunately, my wife headed for the beach for the week and took the camera with her. I have no picture of it getting color but I'll post one once its done and I have a camera, sometime next week.

Time to head back to the shed. The stuff is very particular about time between coats.
Printer Friendly | Permalink | Reply | Top
 
JustABozoOnThisBus Donating Member (1000+ posts) Send PM | Profile | Ignore Thu Sep-11-08 05:59 PM
Response to Reply #6
7. It was good luck getting the right fender
especially after the fiasco with the seat. Did you get that sorted out?

The epoxy primer sounds like good stuff. Is it easy to sand?

Regards.

Printer Friendly | Permalink | Reply | Top
 
ThomWV Donating Member (1000+ posts) Send PM | Profile | Ignore Thu Sep-11-08 10:47 PM
Response to Reply #7
8. Difficult to sand
The mess with the first seat continues. I'm not much concerned about it other than it cost me time. I put in a claim with Pay Pal and I'll see what they do. Otherwise I'll just resell it and eat whatever loss comes with giving a proper description to it with the sale.

As for the primer, the stuff is hard as nails. However its pretty easy to get a relatively smooth coat of it on. I dusted the first couple of coats before laying one down a little bit wet. Two hours later it was not bad to sand using 1000 grit but if I had waited until tomorrow morning it would have been very difficult to sand. When I shot the last of the primer on it this evening I sort of resigned myself to a good hard sanding tomorrow morning. There is no chemical bond - according to the manufacturer - with the water-based paints I'm using so you have to sand the primer to give it "tooth". I'm sort of breaking the cardinal rule of painting here by mixing systems. Mix that with the pretty straight forward fact that I don't have a clue what I'm doing and it makes it interesting. I sprayed a little paint when I was younger but its been years and it wasn't all that much when it was. A couple of years ago I painted our boat with a high-tech paint and it was a real learning experience for me. However that was a boat and you can get away with some flaws in something the size of a football field. This is the first job I've ever done where it has to be perfect technically as well as come out pleasing to the eye - and not my eye at that. Still, can't deny it, I'm enjoying doing it.
Printer Friendly | Permalink | Reply | Top
 
ThomWV Donating Member (1000+ posts) Send PM | Profile | Ignore Sat Sep-13-08 12:07 PM
Response to Original message
9. The next post will have a photograph - she's gonna smile
I finished up the color on the new fender last night and then broke out the other parts that had already been painted and laid them out to match the final color. For reasons unknown to me that tank was darker than any other part so I found myself out in the shed late last night just spraying on more and more coats of my candy blue mix on everything else until I got them all the same. I let it flash then turned on the fan and left for the night.

This morning I inspected the parts and was satisfied with them. There were a couple of little goobers but it was time to finish. It seemed a lot darker than I was looking for it it looked good. I mixed up the clear and went to it. I suspected that the clear would bring out the lighter tones in it, which it did I put on 4 coats of clear, each progressively thicker than the one before it, The last coat was thick but there were no sags or runs. It picked up a good bit of dust and in fact its still just slightly tacky so it might pick up more. I'll let it set for today and then come back and wet sand it and buff it tomorrow or possibly monday. I don't know if she'll like it or not but I am sure of one thing - it will draw comments. The set of metal Harley emblems I picked up on E-Bay arrived yesterday. I need to go find the right kind of 2-sided-tape to put them on, they are chrome with the letting filled in blue.

I'll post a picture of it in a couple of days, I think you all will like it. Whoops! This is funny. Its done, at least the painting part, but to this minute I'm still not positive that I got the right rear fender. I don't have the existing one off the bike yet so I haven't been able to compare them close up. Wouldn't it be funny if the one I did was the wrong one and I had to do it over?
Printer Friendly | Permalink | Reply | Top
 
ThomWV Donating Member (1000+ posts) Send PM | Profile | Ignore Sun Sep-14-08 12:19 PM
Response to Original message
10. Ever have a day when virtually every single thing you touched turned to shit?
Its a good thing I have come to like painting, because I'm going to be doing a lot more of it.

This morning it was time to wet sand and buff the parts. It was a disaster. I fucked up every single part. I will end up repainting the entire bike. Of course that was sort of on the list for this coming winter anyway but I didn't expect it to be caused by my own inattention and sloppy work. Fuck me and every person I ever met in my life.

First the tank. It sanded out and buffed perfectly. It was, and is, a thing of real beauty. No kidding, it is simply stunning. Its also trashed. Like a fool I taped over the gas cap hole up to the edge. After all the buffing and swirl remover was done and the tank was sitting there just beautiful I removed that tape. When I did it two little flakes of paint lifted (color and clear lifted off of the metallic base) right on the edge. Not only do both of the flaked spots show but this split between the coats will give a place for gas to seep in under the paint and lift it. Its inevitable, the paint will definitely bubble up at those spots within weeks. So much for the tank. Back to the paint booth for that part.

Right side (oil tank) cover, sanded through the clear and hit color in one very small spot at the very bottom where it can not be seen. However I know its there - back to the paint booth for that part.

Left side (battery) cover, the black fade is not dark enough on the top and its exposed as well as being right next to the black seat, which makes it look all the worse. Back to the paint booth for that part.

Rear Fender. This one is the real heart breaker. It looks even better than the tank. It was also buffing out very well right up until the nanosecond it took for the spinning buffer pad to grab the tail-light hole edge, rip the fender off the stand, and toss it out onto the ground (I was buffing outdoors). When it struck it landed in a pile of rocks and cut a half dozen gouges in the paint all the way down to the primer - some over an inch long, some an eighth of an inch wide. The god damned thing looks like it was in a 3-car accident. Back to the paint booth for that part.

I put everything away and locked up the shed. I'm gonna go get on my bike and go for a very long ride.
Printer Friendly | Permalink | Reply | Top
 
JustABozoOnThisBus Donating Member (1000+ posts) Send PM | Profile | Ignore Mon Sep-15-08 06:34 AM
Response to Reply #10
11. The Horror ... The Horror ...
What a sickening tale.

But, can the tank and right side cover be saved? Some paint and a small paintbrush might make the chip disappear. It would certainly seal the layers so no gas could get between them. If the chips are small, it might not be noticable. The right side cover may just need some clear.

I'm no expert on painting, my experience being limited to stuff that can be done with a spray can. But is it possible you're moving too fast? Using a power polishing pad on not-completely-dried/cured paint? Unless you have a heated curing booth, it takes a while. My rule (which I break to my peril) is not to polish it if the part still smells like paint.

Just be nice when your wife asks "And how was your week?"
Printer Friendly | Permalink | Reply | Top
 
ThomWV Donating Member (1000+ posts) Send PM | Profile | Ignore Mon Sep-15-08 07:52 AM
Response to Reply #11
12. I've calmed down now - the bike ride helped a good bit
You are probably right but they will probably be repainted anyway.

You and I had pretty much exactly the same ideas. Janet will be back today some time and I haven't done anything yet and won't until she at least sees that I actually did something while she was out and about. My first thought on the tank was that it could be fixed pretty easily and in fact if I had the camera here and posted a picture of it that thought would be reinforced. I could mix up some epoxy and paint a circle around the gas cap hole that extended out from it less than a quarter inch and cover it all. The lifted paint spots are about the size of a BB each. Unfortunately size doesn't matter, its location and effect.

The side covers could be fixed easily enough. A quick blast of clear on one and a little black for the other and all would be well.

There rear fender is a mess - nothing short of a full strip down to primer and start all over is going to work there. The front fender, which I put on the bike just so she can get a better idea of how the bike might have looked, is a lot more tricky. I forgot to mention it in te first post but on it I sanded through everything right to the metal on about a half inch of the very edge of the metal at the bottom of the back of the fender. This too could be fixed pretty easily because all of the outside edges fade to black on all of the parts so a bit of primer, a bit of black, a bit of clear and we'd be back in business.

Actually I suppose you can fix anything - well, maybe not a broken heart - but in this case there isn't much incentive to fix it rather than redo the whole thing. I'll tell you why. First my time has no value. That may sound odd but what I mean is that there are no demands that prevent me from doing it over again and to be quite honest about it I'm only talking about a couple of days to redo it now that I have everything in place. The second reason is that it is my wife's bike and she's never seen what I did with it. I suspect the color is darker than she wanted and who knows if she will like what I did with it or not? However now I have something she can look at and tell me how it stacks up to what she had in mind. So now she can look at this one and tell me 'add this' or 'get rid of that' and make it (chose one) lighter or darker or green or yellow or purple. The third reason is practical; the money is in the primer and clear coat and I have enough of each left to do a half dozen more bikes so expense-wise no matter what she wants me to do with the color or design I'm still only looking at another fifty bucks or so.

At any rate there were a bunch of lessons learned yesterday. First off I need to be a lot more attentive when sanding but also that in trouble spots (edges) to give myself enough material to work with. On the front fender in particular the reason I went through the paint so abruptly was that there wasn't enough paint there. The same thing is true of the side cover that I sanded through. When I was painting the side covers it was difficult to get a good shot at their sides. That is because my working room was too crowded and I was using all sorts of make-shift stands and supports. You might notice in one of the pictures above that the tank is firmly supported on a sawhorse that allowed me to get to all parts of it. I sanded and buffed it with it locked down in that same stand and the result was good. If I had taken the time to make dedicated stands for each part so that they could be more easily painted and secure when sanding and buffing. Next time around every part will be secure in its own holding fixture and my rather caviler painting technique is going to become a lot more thoughtful (read that so say I'm going to put a couple of coats on all the edges as a prelude to to actually painting).

Two last things. You made a good point about letting stuff dry. The water-based paints that I used for base and color are very particular about two things, thin coats and full drying. However because its water getting the things dry is actually very easy. You just stand there with a heat gun and dry them, its only takes a couple of minutes with motorcycle sized parts. With very small parts like the side covers I could actually stand there with the paint gun in one hand and the dryer in the other and paint and dry, paint and dry, and continue as long as necessary. Larger parts like the tank and rear fender weren't much different and because for the most part I was moving from one part to the next giving adequate time for each part to dry. The chemical paints are different. Both the primer and the clear coat react rather than dry. From the moment you pour the hardener into the paint the clock is ticking. First there is an incubation time. After you mix the two parts of the paint you have to let is just sit in the mixing cup for for a specific time before using. In the case of the primer and clear I used both were 15 minutes. After that there are quite specific recoat times; I have the product information sheet for the clear coat in front of me and it tells me to recoat within between 30 and 50 minutes but in no case over 8 hours between coats. If you have to go over the time listed the surface must be completely skuffed (sanded) between coats. Although this might sound a bit contradictory I could actually have sanded and buffed the clear 4 hours after it was sprayed but to be safe I waited 24.

The second thing is that gass-hole. Way back there in the cobwebs of my mind I knew this and I thought the way I taped the hole took care of it, but obviously it did not. When you paint around the gas fill hole all you want to do is stuff a rag or something lint-free into the hole. Don't tape anything on the outside but you can tape the inside of the screw threads. What you want is for the paint to naturally just come to an end, one coat after another sort of tapering off into nothingness so there is no place where there is a clear-cut line cut through the coats. That way there is no place for gas to get between the coats. You can bet I'll be a lot more careful about that next time.

And so that's pretty much it. I rode way up into the mountains yesterday afternoon and it gave me lots of time to think about what I did wrong and how I'd do it next time to avoid the problems with this stab at it. Lessons learned and all of that.

Printer Friendly | Permalink | Reply | Top
 
ThomWV Donating Member (1000+ posts) Send PM | Profile | Ignore Tue Sep-16-08 07:27 AM
Response to Original message
13. This is what it almost looked like (3 Pictures)
Well, this is what it was going to look like. I'll be sanding these parts down later today. Live and learn ..

Tank:


Front Fender:


Rear Fender:

Printer Friendly | Permalink | Reply | Top
 
Richard Steele Donating Member (1000+ posts) Send PM | Profile | Ignore Tue Sep-16-08 11:54 AM
Response to Original message
14. Paint and sand, paint and sand...I do not envy you and your task, Thom!
Edited on Tue Sep-16-08 11:55 AM by dicksteele
I like building things; I'd rather beat metal than eat ice cream.

But that "final finishing" stuff just ain't my thing. I hate it.
I can do it, if need be, but there's just something about it that
rubs me the wrong way. I don't know why- it's just one of my many
wierd hang-ups.

So, I am kind of "in awe" of you folks who can do it.

And, from reading this thread, it's clear to me that you are
really good at what you're doing. That's gonna be a world-class
paint job by the time you're finished with it.

My hat is off to you, Thom!
Printer Friendly | Permalink | Reply | Top
 
DU AdBot (1000+ posts) Click to send private message to this author Click to view 
this author's profile Click to add 
this author to your buddy list Click to add 
this author to your Ignore list Wed Apr 24th 2024, 07:58 AM
Response to Original message
Advertisements [?]
 Top

Home » Discuss » DU Groups » Recreation & Sports » Motorcycle & Scooter Group Donate to DU

Powered by DCForum+ Version 1.1 Copyright 1997-2002 DCScripts.com
Software has been extensively modified by the DU administrators


Important Notices: By participating on this discussion board, visitors agree to abide by the rules outlined on our Rules page. Messages posted on the Democratic Underground Discussion Forums are the opinions of the individuals who post them, and do not necessarily represent the opinions of Democratic Underground, LLC.

Home  |  Discussion Forums  |  Journals |  Store  |  Donate

About DU  |  Contact Us  |  Privacy Policy

Got a message for Democratic Underground? Click here to send us a message.

© 2001 - 2011 Democratic Underground, LLC