| Latest | Greatest | Lobby | Journals | Search | Options | Help | Login |
|
|
|
| Home » Discuss » DU Groups » Home & Family » Gardening Group |
|
| Richard Steele
|
Tue Apr-29-08 08:33 PM Original message |
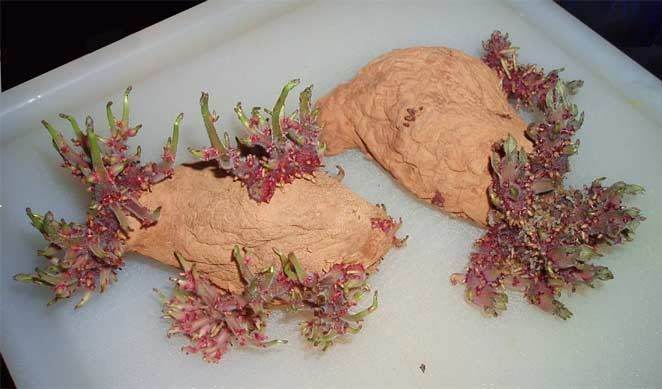
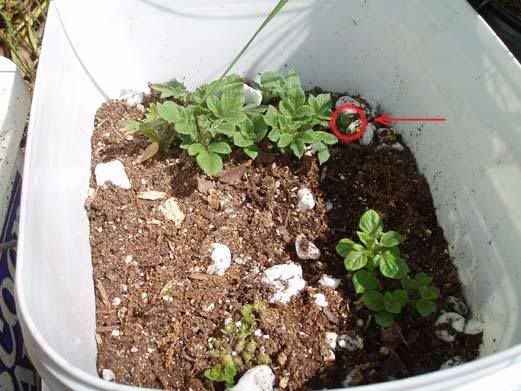
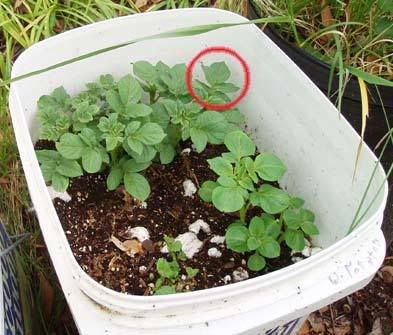
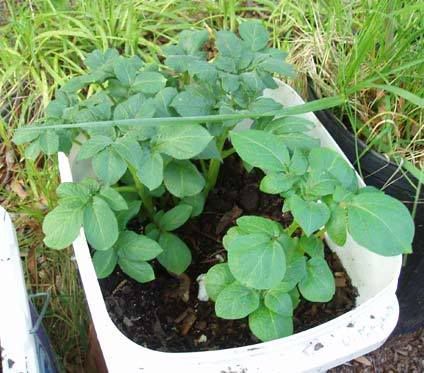
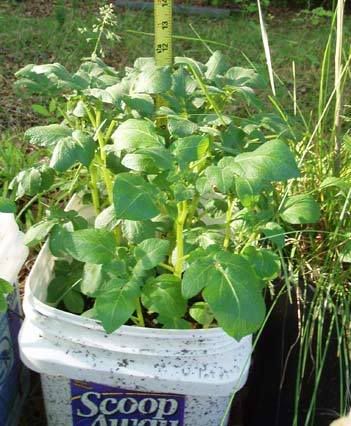
| PotatoWatch 2008, day 23...(dialup warning-pics) |
| Refresh | 0 Recommendations | Printer Friendly | Permalink | Reply | Top |
| Inchworm
|
Wed Apr-30-08 11:20 AM Response to Original message |
| 1. Thanks for these |
| Printer Friendly | Permalink | Reply | Top |
| Shoelace
|
Wed Apr-30-08 02:07 PM Response to Original message |
| 2. tomorrow, I plant my taters in a couple of containers |
| Printer Friendly | Permalink | Reply | Top |
| Richard Steele
|
Wed Apr-30-08 08:11 PM Response to Reply #2 |
| 6. Yeah, we have 2 cats, and that's the bucket that ScoopAway cat litter comes in. |
| Printer Friendly | Permalink | Reply | Top |
| crispini
|
Wed Apr-30-08 10:41 PM Response to Reply #6 |
| 7. You may want to try Feline Pine, if you want to compost your litter. |
| Printer Friendly | Permalink | Reply | Top |
| Shoelace
|
Thu May-01-08 12:05 PM Response to Reply #6 |
| 8. here's the "scoop" on kitty litter in compost |
| Printer Friendly | Permalink | Reply | Top |
| sazemisery
|
Wed Apr-30-08 02:23 PM Response to Original message |
| 3. I planted mine in 55 gallon barrels |
| Printer Friendly | Permalink | Reply | Top |
| Richard Steele
|
Wed Apr-30-08 07:48 PM Response to Reply #3 |
| 5. Blues, eh? The only other bucket I have with plants as large as those in my pics... |
| Printer Friendly | Permalink | Reply | Top |
| hippywife
|
Wed Apr-30-08 07:32 PM Response to Original message |
| 4. Those little buggers |
| Printer Friendly | Permalink | Reply | Top |
| bhikkhu
|
Fri May-02-08 12:38 AM Response to Original message |
| 9. Wow - those look great! |
| Printer Friendly | Permalink | Reply | Top |
| Richard Steele
|
Fri May-02-08 01:50 PM Response to Reply #9 |
| 10. My heart goes out to you folks in the cold states. |
| Printer Friendly | Permalink | Reply | Top |
| LiberalEsto
|
Sat May-03-08 06:21 PM Response to Original message |
| 11. Did you put holes in the buckets? |
| Printer Friendly | Permalink | Reply | Top |
| Richard Steele
|
Sun May-04-08 04:11 AM Response to Reply #11 |
| 12. Yes- I drilled eight 1/4" holes in the bottom of each bucket. nm |
| Printer Friendly | Permalink | Reply | Top |
| LiberalEsto
|
Sun May-04-08 10:48 AM Response to Reply #12 |
| 13. Thanks |
| Printer Friendly | Permalink | Reply | Top |
| brer cat
|
Mon May-05-08 10:00 PM Response to Original message |
| 14. Hi Dick, |
| Printer Friendly | Permalink | Reply | Top |
| Richard Steele
|
Wed May-07-08 01:49 PM Response to Reply #14 |
| 15. Well, we don't have a root cellar (yet)... |
| Printer Friendly | Permalink | Reply | Top |
| brer cat
|
Thu May-08-08 05:13 PM Response to Reply #15 |
| 16. Thanks, |
| Printer Friendly | Permalink | Reply | Top |
| Richard Steele
|
Thu May-08-08 11:45 PM Response to Reply #16 |
| 17. An idea that I've seen mentioned a few times over the decades... |
| Printer Friendly | Permalink | Reply | Top |
| DU
AdBot (1000+ posts) |
Wed Apr 24th 2024, 01:29 AM Response to Original message |
| Advertisements [?] |
| Top |
| Home » Discuss » DU Groups » Home & Family » Gardening Group |
|
Powered by DCForum+ Version 1.1 Copyright 1997-2002 DCScripts.com
Software has been extensively modified by the DU administrators
Important Notices: By participating on this discussion board, visitors agree to abide by the rules outlined on our Rules page. Messages posted on the Democratic Underground Discussion Forums are the opinions of the individuals who post them, and do not necessarily represent the opinions of Democratic Underground, LLC.
Home | Discussion Forums | Journals | Store | Donate
About DU | Contact Us | Privacy Policy
Got a message for Democratic Underground? Click here to send us a message.
© 2001 - 2011 Democratic Underground, LLC